

How To Change The Shape Of The Camera Unity
Have yous ever wondered how professional developers start building complex and astonishing video game worlds? Have you e'er dreamed of creating one of your own? Dream no more than! Unity has got you covered: ProBuilder is here.
ProBuilder is a Unity in-editor prototyping tool that has everything you need to block out your level and create new game worlds in the glimmer of an heart. And this tutorial volition teach you the basics nigh information technology.
When you finish reading, y'all'll understand the core concepts of prototyping. You'll as well know how to:
- Install the API and understand its user interface
- Create bones shapes
- Perform basic 3D operations
- Utilize procedural shapes
- Apply vertex color to your objects to convey certain characteristics
Notation: For this tutorial, no in-depth Unity know-how is needed! Nonetheless, y'all might experience more than comfortable having some bones 3D modeling software groundwork.
This tutorial requires Unity 2020 or later.
Getting Started
Download the project files by clicking the Download Materials button at the summit or bottom of the tutorial. This archive contains the Starter and Final projects.
Unpack the archive and open the How to Utilize ProBuilder for Rapid Prototyping in Unity project in Unity. Your journeying begins!
For this tutorial, you'll only need to locate the Scenes binder. The remaining folders contain helper files, some 3D objects and materials.

Installing ProBuilder and Exploring Its GUI
First become to Window ▸ Package Manager ▸ ProBuilder. Click the ProBuilder tab so you can see its content.

Now, in the lesser correct-hand corner, y'all'll see a Download or Install push button. Click information technology.

Go on in listen that ProBuilder will just be installed in your electric current project. When the installation finishes, close the window and you'll be ready to get. Super easy!
As ProBuilder is a Tool, your access point to its API (its GUI) is in Tools ▸ ProBuilder ▸ ProBuilder Window.
Notation: Depending on your settings in the Unity Editor, you may need to change the Packages filter in the Packet Manager Window to evidence All Packages or Packages: Unity Registry in club to see the Unity Packages available for installation.

Welcome to the spectacular, colossal, new, super-duper, mind-blowing, supercalifragilisticexpialidocious Unity prototyping tool!
[spoiler championship="Window GUI"]
Ta-da!
[/spoiler]
[spoiler title="Catto joke"]

[/spoiler]
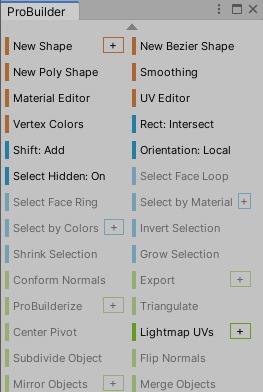
The small window that pops up is the GUI of this new tool. For a fancier-looking version, you can right-click on the window and change the mode to Icon.

Behind Prototyping
Before continuing, you'll break for a moment to learn some general concepts nigh prototyping.
In game evolution, almost everything is about time. That's why developing efficient workflows, including prototyping, is so important. In practical video game terms, prototyping is a pact.
What's the understanding in this pact? Y'all deliver a quick unpolished version of an object, called a Paradigm, with a promise of improve time to come versions, until you evangelize the final product.
What's the reward of the pact? As y'all're not blocking the workflow, everybody — including you — is costless to focus on their tasks.
Deport in mind that your prototypes, whatsoever they are, must mimic or resemble the terminal product: the classic.
An arche-what? To go far simple, the archetype is the "perfect", "final", "polished" version of something that yous want to create.
For example, say you need a tree. You may waste matter a week making a perfect 3D model of a tall, beautiful tree, with branches, twigs, leaves, UV maps, textures… and block everybody else'south job until y'all finish.
Or you can say: A tree can be cleaved down into a light-green sphere for the crown and a brown cylinder for the trunk. Job done, what's next?

If you're in a hurry, cubes are the perfect solution — like a proto-prototyping, if you will. This is the fastest way.
For example, assume you lot don't even take the time to make a proper paradigm. Say you only have thirty seconds, simply you demand that tree… feel the urge? Brand a proto-proto tree. No roots, a cube for the crown, a stretched cube for the body. Washed! You lot are the Lord of the Prototypes… (without the ring, the elves, a good story, Hugo, McKellen, Viggo, swords or fun).

Learning the Basics
At present that you sympathize more about prototyping, information technology's time to learn basics of ProBuilder so you can offset creating levels right away. What differentiates pros from the rest is that they accept consistent workflows and suitable methods for doing things. For this reason, information technology'southward of the utmost importance that you learn the content of this section past heart before moving on.
Controlling Your Camera to Boost Your Productivity
Open Avails/RW/Scenes/0_Camera by double-clicking it. This is a simple scene and yous but demand to focus on 1 thing. Try to locate and navigate to the plane in the Scene tab, somehow.

In the Bureaucracy tab, you'll find a GameObject called Build a cube here. Select it. And again, observe a fashion to navigate to it in the Scene tab.

Have you found it?
No, await, no, stop doing that. Ah, ah… nope… nope… that's… this tutorial is over unless you lot… stop panning and tilting and difficult trucking your photographic camera.
The next GIF shows what most people (including well-nigh professionals) do with their cameras. They printing the right mouse button to enter fly way and employ the WASD keys to move around, similar this:
Whether or not yous identified with the last GIF, from now on, you'll exercise it like a pro, using a consequent method.
Here are the general steps you lot tin utilise to apace and efficiently create prototypes in Unity with ProBuilder.
- Cull a base GameObject.
- Focus by pressing F or MMB (middle mouse push button).
- Create a new shape (by clicking New Shape or Control-Shift-K) with the ProBuilder window.
- Parent the GameObject created.
- ReFocus by pressing F on the GameObject.
- Choose or exist enlightened of selection mode, e.yard. if this is an Object or Element.
You lot may exist wondering why you lot have to exercise it similar this. Using a process like the above is one of the shortest, fastest, tidiest ways to create an object for prototyping, and navigating in Unity.
Now, try it for yourself:
- Choose Build a cube here in Bureaucracy ▸ Level Geometry. This volition exist your base GameObject. Select it.
- With your mouse inside the Scene tab, press F. This tells Unity to focus the scene camera on the selected object. In the instance of MMB, Unity casts a ray from the Scene Camera and returns that point as focused.
- Create a New Shape. You can press the button New Shape in ProBuilder'due south GUI or you can press Command-Shift-K. In either example, you'll encounter an object appear in the scene.
- Put the GameObject within a parent. Drag and drop the newly instantiated object into a parent object. In this example, the parent GameObject is Build a cube here.
- Refocus by pressing F on the newly created GameObject Cube.
- Detect the mode the object is in. In this instance, information technology should be Object Selection mode. From left to right the options are Object Pick mode, Vertex Selection way, Border Selection mode, Confront Selection way.
![]()
What do some of the steps in the list above accept to do with pro photographic camera management? Because, from now on, you'll never always tilt, truck or pan your camera as if yous were releasing repressed acrimony against it. If somebody else is watching y'all, they'll be pleased as well.
Press Alt and LMB (left mouse button) to gently rotate your camera, Alt-RMB (right mouse push button) to accurately zoom your camera, or Alt-MMB to soft dolly your photographic camera.

Now you're truly an object-creator-camera-director-Unity-pro developer. And y'all're set up for the side by side stride.
Basic Tools
Open Assets/RW/Scenes/1_BlockOut. This scene contains a city constructed with various epitome parts.
Y'all can press play to accept a tour around the urban center. Information technology'south nice to know yous can exam the game. It seems the game designer and the game artist accept been working while you were preparing to continue blocking out the level.
This scene is divided into four sections, and each i represents a level of complexity. Yous'll use the first three.
Using the Bureaucracy window, navigate to Level Geometry ▸ Commencement Level and expand until you meet the You lot Build Cube Hither GameObject.

Think the steps? Focus on the You lot Build Cube Here GameObject by pressing F. Create a New Shape using ProBuilder's GUI.
Side by side, apply QWERTY keys to move, rotate and stretch it.
Your task is to build a skyscraper. Try selecting the calibration tool and stretch the new shape quite a scrap.
You are probably panning… or tilting… and/or difficult trucking your camera once more, right? Old habits die hard. Information technology'southward OK… no it's non, that'southward a paddling!

This is the fastest way of prototyping, but it comes with a setback: Yous're directly stretching the GameObjects scale. That's no adept, so employ this sparingly.
Oh, you forgot to parent the GameObject. That's a paddling. Put your new object where it belongs. Parent the new Cube shape to the You lot Build Cube Here GameObject.
Discover this whole function of the city is fabricated up of stretched cubes. Exercise a flyby if y'all demand to.
Creating Basic Shapes
In the Bureaucracy, motility on to the Second Level.

You'll find a You Build Cube Here, and y'all know the drill. Follow the steps:
- Select the GameObject and press F to focus it in the Scene view.
- Create a New Shape using the ProBuilder window.
- Parent the new GameObject to You Build Cube Hither.
- Focus again with F.
- Be aware of ProBuilder selection mode.
This time around you'll learn near pick mode. Check the 4 icons that appeared when yous opened the ProBuilder's GUI.
There are two groups. Object Selection is represented by a cube, and the other iii element modes are: Vertex Selection, Edge Selection and Face up Selection (in that order).

Exist certain to select one Chemical element and then you don't mess with the scale or rotation of the object. Now, select Face Selection and move faces around on your new shape until you've created something that resembles a building. Play around until yous come up with something y'all like.
Congrats! Yous've created your get-go skyscraper.
Extruding and Insetting
Functions like extruding and insetting are ofttimes used because they add together meaning to your object, so now it's time to play with these.
Extrude a new rooftop by selecting the uppermost face of your GameObject by pressing Control-E. You can motility the face around with common Unity Move, Rotate and Scale tools (keyboard shortcuts W, East, R).

Now add a slanted face. To do that, you demand to extrude the unabridged right confront (from your perspective). As in most 3D software programs, you can add to your option by holding down Shift.
So, select a confront from the right side of the building, and by holding downwardly Shift, select the other. Now, yous tin can extrude them by pressing Control-Due east. Play tricks: If you hold Shift while using the common Motion tool (W), you'll also extrude a face.

1 last stride: Change to Edge Selection and move the uppermost border from the newly face created downwardly. And there you lot take it, a slanted face.

What else can you lot add? A parapet! Select the uppermost face (call up to choose Confront Selection mode) of the beginning structure you made. Extrude it up just a tiny corporeality. Imagine what the parapet looks like in comparison with the rest of the edifice.

Since you're upward here, you'll learn how to inset.
Select the uppermost face (call back to choose Face Choice Mode) of the get-go cube you lot made. Alter the Scale tool by pressing R. Now drag the heart handle (the gray 1). The face increases and decreases its size. It works as yous'd expect, but that's not what you want in this case.
If you need to, press Command-Z to undo changes. At present repeat the last action, merely while holding downwards Shift. Voila!
If you feel that the Calibration twool changes too fast, add Alt to the combination. That fashion, the Scale tool will reduce its influence. Controlling this technique will heighten your workflow.
Adding faces and complexity makes construction more interesting, so feel complimentary to use what you've learned and add more details.
In case you need a refresher on the techniques learned so far:
- Extrude
- Inset
- Motility

Adding Loops
Moving on, you can make your building even more than complex past adding headers. In Edge Option, select a vertical edge on the side of the building and press Alt-U while targeting that border.
You tin motility edges, faces and vertexes effectually. Notice that loops are created perpendicular to the selection. And, of course, you tin move them autonomously using Unity'due south basic move tools.
Motion the newly created horizontal loop up with the Move tool. Once the ii loops are in position, just below the slanted confront you created before, you can select the entire loop (group) of faces past pressing Select Face Loop in the GUI or by selecting ane face up, pressing Shift and double-clicking the same face up. Easy!
Now, with all your faces selected, press Command-East to extrude a header.
Practice and endeavour to make your own simple edifice. Add together another header and more faces. Continue it uncomplicated!


Not-Standard Shapes
Now that you know how to create standard shapes, it's fourth dimension to move on to creating not-standard shapes.
Procedural Shapes
Luckily, if you want to get into more complex shape building, Unity has you covered.
From at present on, y'all'll create shapes by pressing Shift-Control-Thou. And then, retrieve The Five Betoken Palm Exploding Heart technique… err… no wait, the Vi-Footstep Method to Creating Anything With ProBuilder technique…
Do you dear trees? Go to LevelGeometry ▸ Second Level ▸ Yous Build Tree Here and follow the drill once more:
- Select your base You Build Tree Here and press F (if not in sight) to locate information technology in the scene.
- One time you see the green arrows, press the MMB against the street floor.
- Press Control-Shift-Thousand and you'll run into a new window pop up. A dark-green cube volition appear where yous clicked. This is a ProBuilder procedural shape. Click it and press F again to focus on information technology.
Why is information technology greenish? This means that unless you press the Build button in the GUI, Unity won't confirm its existence in the Hierarchy.
Every Shape has dissimilar settings. In the example of the cube, you can, for case, make a cube with Size (Ten: 10, Y:10, Z:10) out of the box by changing the X, Y and Ten values.
Detect that when you press Build, information technology's but so that Unity assigns a new material telling you that object was in fact created.

Back to the tree. Follow the technique (oh, you're getting skillful at it). This time, select Cylinder and make it resemble a torso. Don't forget to Build it, then name it Torso and parent the GameObject afterward.

Then repeat the whole process, simply this fourth dimension select Sphere. Check that the sphere has Subdivisions (determines the corporeality of triangles the mesh will accept), and a Radius (that represents the overall size).
You tin can stretch the height of the tree using the Calibration (R) tool. How can you select all the faces at once? Enter Confront Pick way. Click on an empty space and drag to select all faces. And at that place you go. A beautiful tree!

To borrow from Men in Black, fifteen hundred years ago everybody thought the Earth was the center of the universe. Five hundred years ago, everybody thought the Earth was flat. And fifteen minutes ago, you idea Unity didn't have a ProBuilder API. Imagine what you lot'll know tomorrow.
Vertex Painting
Moving on, exercise yous want to know how to paint your tree? Be warned: This is the near difficult, arduous, arduous, titanic action always performed by a game engine in the history of game engines.
Select the Body GameObject in the Bureaucracy. Press F to focus. Locate the Vertex Colors button on the ProBuilder's tab.

A new window volition pop up. Press Utilize on the colour you desire. If yous don't like whatsoever of them, click the dropper on the right and select the color you want.

Done! Next!
Seriously, that's all.
Paint the superlative of the tree, and that's information technology for this part.

Remember that the paradigm should resemble the archetype. Green means the tree is live and that it has leaves. Imagine what a yellowish color would mean.
Congratulations!
Remember that this tutorial is near prototyping, but it'due south likewise almost showing off ProBuilder and what y'all can do with it. So, sometimes you need to deliver prototypes that are amend or more specific than a bunch of cubes. After all, games are all about conveying and projecting sensations and feelings.
So, suppose you desire to block out a elementary city. Suppose you want to convey some humor and, at the aforementioned time, transmit a sense of placidity and familiarity. Well, add a park, add people, and add some mutual everyday stuff.
What? A coffee store? Why not a donut shop! Welcome to WenderDonuts!

If you have a look effectually, everything has been made, painted and arranged using ProBuilder. It's your turn to add together something. Follow the next part of this tutorial.
Making a Donut
Inhale deeply. Can you odour it? The aroma of a fresh-baked chocolaty donut? Aaah.
Locate Third Level in the Bureaucracy. Go to You Build Donut Hither. Press F to focus.
This fourth dimension, you'll demand to trust that Unity will create your procedural shape in place. Press Control-Shift-K. You lot might be tempted to create a cube, or to create a cylinder and stretch it, but Unity has put a Torus in the Shape Selector.
Select the Torus shape, but before starting to change information technology, information technology'southward a expert thought to have it in the right place.
Make sure you are in Object Selection Manner, and so use the Motility and Rotate tools to position information technology the way you similar until yous experience information technology's function of the WenderDonuts sign.

Now tweak the values. Although they should be self-explanatory, information technology'southward all-time to familiarize yourself with them. For instance, you don't need to alter the Rows or the Columns corporeality unless you see the quality of the mesh is too depression.
In this instance, you only need to change Radius and Tube Radius until yous see something similar looking to an edible donut.
Once your donut is in place, press Build. Parent the donut to You Build Donut Hither.
In RayWenderLand, donuts without glaze are illegal (and that's punishable by a paddling). Every bit yous already know how to paint, it's just a matter of selecting faces. Select the donut, focus in on it with F, and change to Face Selection mode.
Now, you could be tempted to select faces one by one. But, information technology'south easier to select half a column. Then, if you lot press Alt-G or the Grow Pick button, Unity volition select all rows across.
Click Vertex Colors to select a color for the glaze area face pick. Now to do the other side. Printing Control-I or click the Invert Pick button in the ProBuilder editor. Choose Vertex Colors again to choose a different color for the other side. Accept fun!
As it'due south difficult to explicate face selection by typing, here's a visual aid:

Add some sprinkles to make it yummier! Use MMB to position the editor location for each sprinkle placement. Press Control-Shift-K to open the Shape Tool window. Select the Cube shape and agree Alt while moving values around. This allows you to make precise adjustments to add together sprinkles.
These values should be OK:
- Ten = 0.08
- Y = 0.39
- Z = 0.1
Click Build. Now make some copies, paint them with Vertex Colors, and rotate them to your liking. Remember to parent them to the Donut. Then you're done!


Making an Arch
Now that you've mastered donuts, it's time to make an curvation. The intersection between the street and the bridge seems to exist a adept place for this, and then go to You lot Build Arch Here.
The instructions must await familiar to y'all by at present. Can you exercise this step from memory? Attempt it!
After you lot press Control-Shift-K, search for Arch. In this case, the arch needs some tweaking.
First of all, in Object Selection mode, change to the Rotate tool and make sure the arch crosses the street.
Ironically, information technology's difficult to picture the size of the arch in perspective view. Merely Unity has you covered with Isometric and Orthographic views.
The Scene window shows the world coordinates in the apical right corner. Printing Y to wait from in a higher place so press Top (for the orthographic view).
If your cat stumbled over your keyboard and messed up your Curvation shape settings, don't panic. Apply these values instead:
- Radius: 6.5
- Thickness: 1
- Depth: one
- Number of Sides: 8
- Arch Degrees: 180

Once you're satisfied with the values, press Build.
At present, Select the two faces of the Curvation that are facing down (Use Face Pick mode). Press Control-East to extrude, and move them near to the floor. That'south a squeamish arch portal.

Polygon Shapes
It's awesome to accept procedural shapes, cubes, cylinders and more, but what if you want to make a gingerbread person? You guessed information technology: Unity can do that too.
Follow the usual method pace by step, only this time, instead of creating a new shape, select New Poly Shape from ProBuilder's tab.
Your mouse is now a vertex creator. And so, every time you lot click, Unity will 'take hold of' a Vector3 position in the editor and create a vertex at that place. You can continue drawing whatever you want. To confirm your creation, printing Enter.
Conscientious here! After following that last step, your mouse will take the perpendicular (normal) direction to the original figure you've drawn and extrude it.
You'll ostend the terminal step by clicking in one case more. It'south OK, yous can go back using Command-Z, as Unity's undo is awesome and quick.
Save the scene to capture your progress.

Export — Import
Moving on, information technology'due south fourth dimension to learn how to export and import objects created using ProBuilder. To begin, you can create in-depth detailed objects in separate scenes, and then, when you're satisfied, you tin import them into a working main scene.
Get to 2_ExportImport in the Scenes folder. Open it. Select Level Geometry in the Hierarchy and press F to eye the view on it. Take a look at that! Isn't it awesome?

But what if your team leader asked you to put information technology in the main scene (1_BlockOut)? With ProBuilder, it's easy! Become to Tool ▸ ProBuilder ▸ ProBuilder Window and open the GUI, if information technology'south not open already.
In the Hierarchy, become to Level Geometry ▸ Reference Airplane ▸ Altar and select information technology. In the GUI, at that place'south an Export button. Click it.
This volition consign your object every bit an .obj file, forth with all its children. Find a proficient place to store information technology in your project binder.

Lastly, reopen the BlockOut scene. You tin bring your altar back by dragging and dropping it to the Models folder every bit you would any other obj. It'southward that like shooting fish in a barrel!
From there, elevate and drib it in your scene and place it wherever y'all like.

Useful List of Shortcuts
Now that you've mastered the above, here's a short list — that is non by any means thorough — with the nearly frequently used hotkeys.
All Selection Modes
- G to go back to object selection and render to the last state.
- H volition toggle select mode (Unity too uses H to hide objects from view, merely you tin rebind information technology).
Edge
- Alt-B to bridge edges
- Alt-U to insert an Edge loop
- Alt-R for ring selection
- Alt-L for loop selection
- Shift-Control-I to invert pick
- Shift-movement to extrude an border or a confront
- Alt-Due south to divide the selected edge
Face
- Control-E to extrude
- Backspace to delete a face
- Shift to add more faces to your selection
Vertex
- Alt-C to collapse a vertex
- Alt-X to separate a vertex into 2
Where to Become From Here?
Download the completed project files by clicking the Download Materials button at the top or bottom of the tutorial.
Congratulations, you made it. If you want to keep learning, go check out the Unity ProBuilder Manual.
If yous want an extra claiming, practice you run into the alpine building on burn?

That'southward how you tin can prototype a proper protofire. Test your skills. Create a ladder to save everyone in the building. The idea is that you can tweak the values until the ladder reaches the window.
Creating games is an art. To hone your skills, look for books almost level design, level fine art and game design.
In whatsoever example, practice, practice, exercise until you feel rapid prototyping is 2d nature to you and you remember nigh of the commands.
Go ahead and re-create levels from your favorite games or real landscapes. The possibilities are endless.
We promise yous enjoyed this tutorial. If you have whatsoever questions or comments, please join the forum discussion beneath!
Source: https://www.raywenderlich.com/12008376-probuilder-tutorial-rapid-prototyping-in-unity
Posted by: halpinhounch39.blogspot.com
0 Response to "How To Change The Shape Of The Camera Unity"
Post a Comment