

How Can Someone Subscribe To My Shopify Blog
In this article, I'll show how to build a paywalled blog with Shopify using HTML, CSS, and Liquid (Shopify's template language). Even though Shopify's blogging features are somewhat basic, and there are other online services that specifically help bloggers to set up blogs that readers can subscribe to for a fee (such as Ghost), I'll explain why you might rather use Shopify.
Huh? Shopify for content? Why?
Shopify is arguably leading the ecommerce space. It has the most customers and the highest number of (well-executed) out-of-the-box features compared to its rivals.
Shopify can facilitate the sale of almost anything, including subscription-based services, digital downloads, free swag, and even in-store items thanks to its point-of-sale system.
I would say that most believe Shopify to be number one at ecommerce, and while there are specialized services for selling access to content, I still believe Shopify is the better option.
Let's compare Shopify with Ghost, for example, since Ghost is the fastest-growing blogging CMS today.
Shopify Basic and Ghost Pro Basic are both $29/month. However, Shopify can sell anything, whereas Ghost can only sell access to subscription-based content. Ghost can't sell access to content for a one-time fee, or anything else on the side. Shopify wins hands down when it comes to business-model flexibility.
Honestly, the only caveat is that the blogging features are considered to be Shopify's weak link, but if you enjoy building themes from scratch (which frankly comes with many benefits), then you'd be surprised at how mighty and flexible Shopify's Liquid template language is. I wouldn't consider Shopify an ecommerce platform, but rather a CMS with roots in ecommerce.
So, if you'd like to leave a new venture open to additional/alternative business models or you already have a Shopify store with a blog that you'd like to monetize, let's kick things off.
Prerequisites
You'll need to be reasonably skilled in web development, understanding HTML and CSS, at least. Some knowledge of the Liquid template language that Shopify uses would certainly be beneficial, but not required, since Liquid is somewhat easy to learn along the way. (I'd recommend checking out the Liquid documentation regardless.)
You'll also need to create a Shopify account, which is free for 14 days (no card required). Please note, however, that unless you pick a payment plan, you won't be able to remove the password protection on your store.
Step 1: Define the Theme Structure
First, let's define the file structure of the theme using a mixture of required and common files. We won't use all of them in this tutorial, but you can use this structure to kickstart any barebones Shopify store in the future. The files can be blank for now:
. ├── assets ├── config │ ├── settings_data.json │ └── settings_schema.json ├── layout │ └── theme.liquid ├── sections ├── snippets └── templates ├── 404.liquid ├── article.liquid ├── blog.liquid ├── cart.liquid ├── collection.liquid ├── customers │ ├── account.liquid │ ├── activate_account.liquid │ ├── addresses.liquid │ ├── login.liquid │ ├── order.liquid │ ├── register.liquid │ └── reset_password.liquid ├── gift_card.liquid ├── index.liquid ├── list-collections.liquid ├── page.liquid ├── password.liquid ├── product.liquid └── search.liquid If you're following along on macOS or Linux, you can use the following commands to generate the structure:
mkdir -p assets snippets sections config layout templates/customers touch config/settings_data.json config/settings_schema.json touch layout/theme.liquid cd templates/customers touch account.liquid activate_account.liquid addresses.liquid login.liquid order.liquid register.liquid reset_password.liquid cd .. touch 404.liquid article.liquid blog.liquid cart.liquid collection.liquid gift_card.liquid index.liquid list-collections.liquid page.liquid password.liquid product.liquid search.liquid # back into the project root cd .. Further reading:
- theme file structure
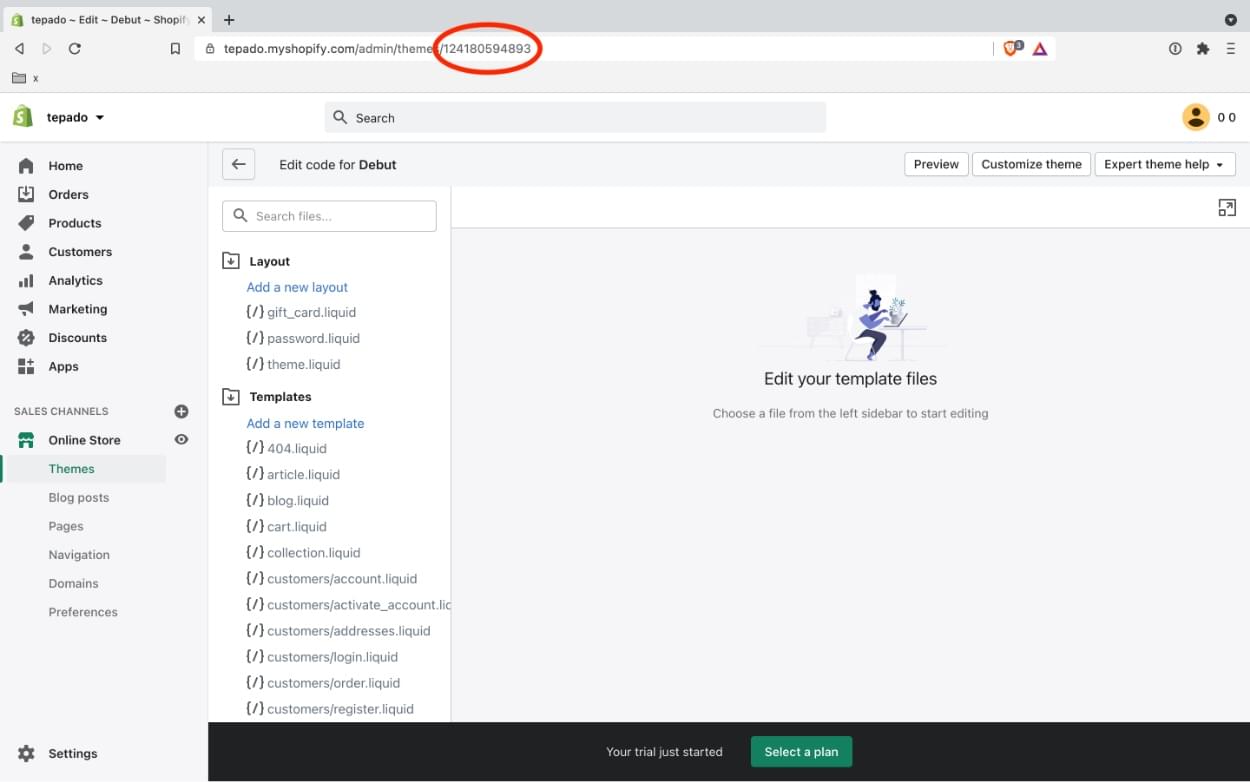
Step 2: Obtain the Theme ID
Next, we'll need to obtain the theme ID of the default theme ("Debut") that should already be installed. Within the Shopify admin, navigate to Online Store > Themes > Actions > Edit code and then make note of the numeric theme ID in the URL. If you already have a theme set up, use that theme ID instead.
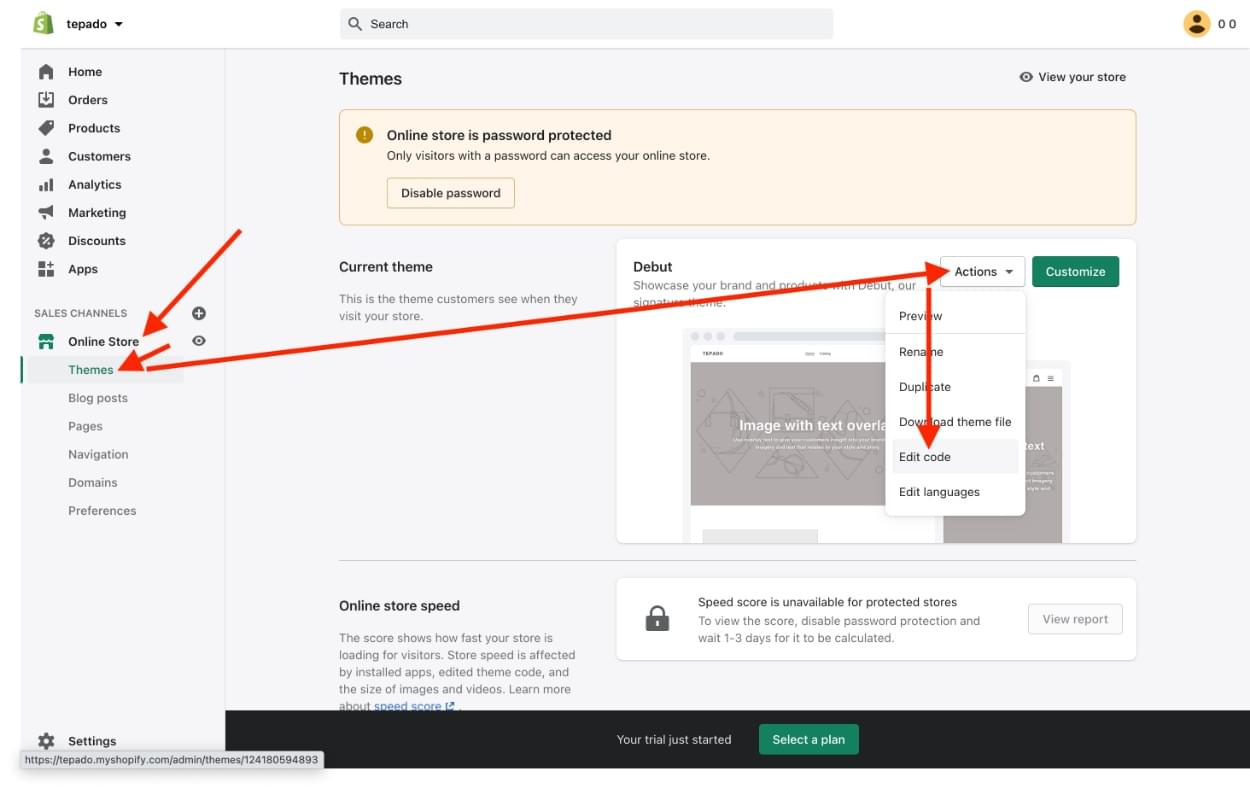
Note: while the default theme — "Debut" — is a fully-functioning coded theme, we'll be overwriting it with our code.
Step 3: Set up Theme Kit
Theme Kit is a command-line tool for building and managing Shopify themes. In this tutorial, we'll use Theme Kit to watch for code changes within our theme directory and deploy those changes to our theme.
Theme Kit works on Windows, macOS, and Linux, and works with workflow tools such as Git and Node.js. To keep things fairly simple, we'll omit workflow tools and just use Theme Kit.
Install Theme Kit
First, install Theme Kit using the command line.
Windows and Chocolately
choco install themekit macOS and Homebrew
brew tap shopify/shopify brew install themekit Linux
curl -s https://shopify.dev/themekit.py | sudo python Create a Shopify "app"
Next, create a Shopify "app" to acquire the necessary credentials that Theme Kit requires in order to authenticate theme changes.
Within the Shopify admin, navigate to Apps > Manage private apps, then tick the three checkboxes to accept the terms and conditions. Next select Enable private app development > Create private app and complete the form.
In this step, you'll need to give your private app a name and enter an emergency developer email. You'll also need to enable "Read and write" access for "Themes" before clicking on the Save button. This final point is hidden behind a Show inactive Admin API permissions dropdown.

Finally, click Create app and make note of the "Password" on the next screen.
Watch for code changes
With Theme Kit installed and both our theme ID and Password ready, we need to run the watch command from the command line.
First, cd into your theme's directory.
Next, run the following commands to open the theme in your browser and to watch for code changes. Remember to replace xxx with your myshopify URL (minus the https://), <password> with your password, and <theme-id> with your Shopify theme ID:
theme open -s xxx.myshopify.com -p <password> -t <theme-id> --hidepb theme watch -s xxx.myshopify.com -p <password> -t <theme-id> --allow-live Note the additional flags:
-
--hidepb: hides the annoying Preview Bar -
--allow-live: some understandable friction to let you know that you're editing the live theme (in case you aren't aware!)
I would suggest running the above command sequence as an Alfred workflow (or similar) for convenience. While you can store theme credentials in a config.yml file, I wouldn't risk accidentally exposing them — for example, via GitHub (which would be a security flaw).
And with that done, let's dive into the code side of things.
Step 4: Create the Theme Wrapper (theme.liquid)
We'll start with theme.liquid file, because not only does it have some specific requirements, but it's one of the most important files in a Shopify theme. Put simply, this file is the theme's wrapper: anything marked up in theme.liquid will appear on every page. You'll want to start off the markup like this:
< !doctype html> <html> <head> < ! -- head markup -- > {{ content_for_header }} < /head> <body> < ! -- header markup -- > {{ content_for_layout }} < ! -- footer markup -- > < /body> < /html> You've likely noticed from the code above that to output something with Liquid you'll need to use double curly brackets ({{ }}). On that note, there are two things that have already been outputted. These are required, and Theme Kit will throw an error if either of them are missing from your theme.liquid:
-
{{ content_for_header }}: a code injection of everything that's required to make features like Shopify Analytics work -
{{ content_for_layout }}: injects the relevant template (e.g.blog.liquid), all of which are stored in/templates
Remember, Theme Kit is watching. Whenever you save your file, Theme Kit will know and deploy the changes to your remote theme (although you'll have to refresh your browser to see them).
Step 5: Loop over the Articles (blog.liquid)
During this next step, we'll dive into blog.liquid and loop over all of our articles. If you haven't created any yet, head to Online Store > Blog posts and create a blog along with some articles, remembering to set their visibility to visible (the default is hidden).
You'll find said blog at https://<store-name>.myshopify.com/blogs/blog-handle/. The default Shopify blog is at /blogs/news/.
Pasting the code below into blog.liquid will list all of the articles from the current blog, displaying each's article title wrapped in an <a href> element that links to the relevant article:
{% for article in blog.articles %} <a href="{{ article.url }}">{{ article.title }}< /a> {% endfor %} Further reading:
- Blog Object Liquid Reference
- Article Object Liquid Reference
Step 6: Output the article (article.liquid)
During this step, we'll write the code for article.liquid. This will output the article, but if the user isn't a logged-in, paying customer, it'll be blurred and a Get access button will take the user to /cart/ (and after that, the checkout).
Create a "Product"
First, we'll need to create a "Product" that offers access to the blog for a one-time fee (Shopify can do this natively) or on a subscription basis (Shopify subscription app required).
Navigate to Products > Add product and name it something like "Premium blog access". Naturally, ensure that you uncheck the Track quantity and the This is a physical product checkboxes.
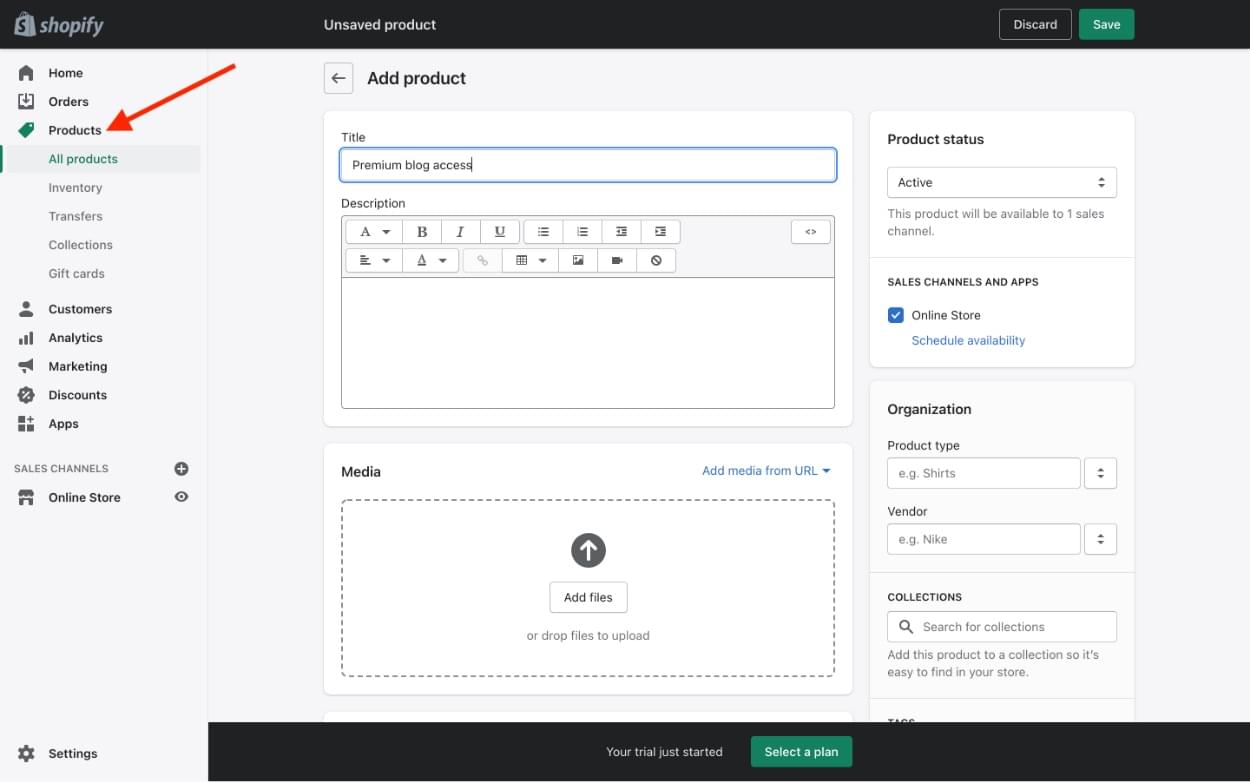
Click Save and then make note of the Product ID from the URL.
Pre-write some logic
Use the following code to check if the "item" is in the cart already, replacing "ID" with your Product ID. We'll check for the existence of the accessInCart variable later to ensure that users can't accidentally add the item to the cart twice:
{% for item in cart.items %} {% if item.product.id == "ID" %} {% assign accessInCart == "y" %} {% endif %} {% endfor %} Similarly, use the following code to check if the customer (assuming that they're logged in) has access already. We'll check for the existence of the hasAccess variable later to ensure that logged-in customers aren't being shown the Get access button or being restricted from viewing the content.
Again, remember to replace "ID" with your Product ID:
{% if customer %} {% for order in customer.orders %} {% for line_item in order.line_items %} {% if line_item.id == "6816002113696" %} {% assign hasAccess == "y" %} {% endif %} {% endfor %} {% endfor %} {% endif %} To make the code a little more DRY (don't repeat yourself), include both of these code snippets in theme.liquid if you'd like to include a Get access button anywhere other than article.liquid. Putting the code snippets in theme.liquid ensures that the accessInCart and hasAccess variables can exist within all /templates.
Note: you'll also want to include the following "is the customer logged in or not?" logic in theme.liquid so that customers can log in or log out from any page or template:
{% if customer %} <a href="/account/logout/">Logout< /a> {% else %} <a href="/account/login/">Login< /a> {% endif %} Output the article
Next, the following code will output the article but add a .blurred class if the customer doesn't have access to the blog (or isn't logged in and therefore access can't be verified):
<article{% unless hasAccess %} class="blurred"{% endunless %}> {{ article.content }} < /article> Include the following code in your CSS to enable the blurring:
.blurred { opacity : 0.5 ; filter : blur ( 0.5 rem ) ; user-select : none; // Prevents text selection pointer-events : none; // Prevents click events } As a bonus, you might want to use JavaScript cookies or localStorage to allow the reading of [x] articles, and then apply the above .blurred class only after those articles have been read. This improves SEO by allowing the articles to be indexed and improves conversions by offering limited access.
Create a "Get access" button
Finally, here's the Get access button logic and markup:
{% unless hasAccess %} <a href="/cart/{% unless accessInCart %}add/ ?id=ID&return_to= /cart/{% endunless %}">Get access< /a> {% endunless %} Once again, remember to replace "ID" with your Product ID.
Further reading:
- Cart Object Liquid Reference
- Order Object Liquid Reference
- Article Object Liquid Reference
Step 7: Build out the Rest of Your Theme
Alas, the final step is one that you'll have to take alone: to build out the rest of your theme. In Step 1 we created some .liquid files in /templates. Some of these (for example login.liquid and cart.liquid) are essential to maintaining the "Premium blog access" functionality.
Consult the official Shopify themes documentation, which will not only walk you through the basics of creating a Shopify theme, but also each individual .liquid template (here's some sample code for login.liquid, for example).
Enjoy developing the rest of your Shopify theme!
How Can Someone Subscribe To My Shopify Blog
Source: https://www.sitepoint.com/build-shopify-subscription-blog/
Posted by: halpinhounch39.blogspot.com
0 Response to "How Can Someone Subscribe To My Shopify Blog"
Post a Comment