

Beginner Still Life Reference Photos

Will Kemp, Still Life with Figs, Photograph, 2012
Have you ever got out your digital camera to take a shot of your still life set up and been sorely disappointed with the results?
Your photo looks washed out, or too dark or the flash had popped up and flattened the whole scene.
You're not alone in the quest for a simple formula to create great reference photographs for your paintings.
You might have tried turning the dial to the 'manual' mode, fired off a few shots, got disheartened, only to return to the safe haven of the 'flower setting' or 'Auto' on the dial.
Understanding the manual functions of your digital camera can be a liberating experience and can greatly improve the framing of your paintings.
Or maybe you've never used your camera to help with your paintings but you'd like to learn how…
Photographic reference vs Painting from life?
Many purist will sneer at you if you tell them that you're working from photographs when painting, they say you'll lose the feeling, the emotion and the accuracy of colour.
With all of these points I'd have to agree.
It's harder to judge realistic colours accurately from a photograph than from life.
Trying to capture the fleeting moment of a view or the atmosphere of a scene when you're in that environment is near on impossible to emulate in a photograph.
And the unexpected change of light or the ability to be able to move your viewpoint to capture an unplanned moment will never happen from a static image.
However, for learning fundamental skills in drawing and painting, working from 'the flat' is very useful indeed.
But don't just take my word for it, ask Van Gogh.
How Van Gogh taught himself to draw

Before self-study: Van Gogh,1880 After studying the Barque Plates: Van Gogh, 1883
What do you think of when I say 'Van Gogh'?
Thick paint?
Sunflowers?
Mad Man with one ear?
Very rarely do we think of an accomplished draughtsman.
Although Van Gogh is known for his bright passages of colour, in his own studies, he was obsessed with developing the accuracy of his observational drawing.
Instead of working from life, he taught himself to draw from a book by Charles Barque.
Charles Barque created a collection of exercises, most commonly know as Barque plates. They are a way to develop and practice your drawing skills by slowing developing a construct to your drawings. They can be a very effective method of learning.
When you're developing your painting techniques, photographs can become invaluable in much the same way because it's easier to develop your artist's eye and transfer a 2-D image to a 2-D canvas, rather than looking at a 3-D scene and trying to recreate that 2-D to appear 3-D.
By having a photographic reference the advantages are many.
- You can set it up exactly as you want and capture a moment in time when the lighting is exactly right, the petals on your flower set up haven't fallen off and when you come back to it a week later, you can get back straight back into the painting with no delay.
- You can work at an easel with your reference image 1:1 scale with your canvas. This makes judging shapes when you're drawing easier, by flicking your eyes between the two.
- You can observe colours in isolation to help train your colour perception when you're first starting colour mixing.
So even if you choose to mostly work from life, working from photographs can be a stepping stone in learning the secrets to framing your subjects, using light to create form and simplifying your vision.
And just because we are using a photographic reference, it doesn't mean we're looking for a photographic painting.
When I'm working on a painting that has to solely rely on photographs, I'm always aiming for that 'glasses off' effect. Now, if you've never worn glasses or contact lenses this effect can be gained by simply squinting your eyes until everything goes a little blurry.
When my painting looks photographic through this blurred vision, it's about right for the level of realism I prefer.
So embrace your photographs, and try to use the manual function on your camera because this is where the secrets to your success lie.
Using your camera
I've been busy filming my new 'Still Life Course on Reflections' (more details next week) and when setting up the photo shoot for the still life, I realised how many different subconscious and conscious processes and decisions I go through to enable me to create a good composition.
With so many tutorials and guides available on using your digital camera, I wanted to share the approach I use for shooting a photograph like a painter.
Giving you a result that will transfer best into a painting and mimic how you would view a still life from life. So when you don't have the camera with you, painting from life will seem a familiar process as you've already discovered what to look for.
This process will also empower you to be confident enough to take your own shots instead of endlessly searching flickr for a creative commons image to work from.
In this three-part series we're going to look at:
- Understanding the basic functions of your digital camera
- Setting up our still life study in the right lighting for the best results for your painting
- Taking you through the process of the painting in a step-by-step tutorial
We're going to use the principles that would make a good drawing, just using the technology of a camera to speed up your learning curve and also discover the settings to use on your camera that are best to emulate how you actually see as an artist when you're composing a composition.
Understanding how your digital camera works
For this tutorial, we will be working with a DSLR (digital single lens reflex).
You can change a number of things in the camera settings that results in an image that is more suited to replicate how the human eye sees, therefore more suitable as a reference image for a painter to work from.
A common mistake many beginners make is to take a photographic reference where everything is in perfect focus, thinking this is the best thing to do as you've got a perfect photograph that captures every detail in front of you – but this isn't how the human eye sees.
When you focus on an object in real life, it's amazing how little your eyes can actually focus on at one time, as your peripheral vision is very blurred.
For example, if you have a still life setup with a window behind, in reality if you were observing from life, you would either focus on the still life or the view in the distance through the window – you can't focus on both at the same time.
If you took a photograph and the camera focused on the view out of the window as crisply as the objects in the still life you'd already have a poor reference photo to work from.
The resulting painting would appear flat, unrealistic and the scene loses perspective from the focus point because everything is the same level of detail, your painting will automatically look more based on a photograph, rather than observed from life.
We can change the amount of focus in a photograph by altering what's called the camera's 'depth of field.'
Before you read on, I feel it's only fair to warn you about the amount of technical considerations you need to know in order to take a reference photo with full creative control of the process.
If you're just beginning with your photography but still want a good shot to work from, below is my emergency 5-minute camera set up, to fall back on when all else fails.
You'll get pretty decent still life shots you can use to paint from.
5 Minute Quick Shoot Step-by-Step Setup
 Aperture priority mode
1. Turn the dial on the top of the camera to Aperture Priority Mode. This normally has the symbol of A on a Nikon and Av (aperture value) on a Canon.
2. Find the dial on the front or the rear of your camera (depending on the model) to change the aperture number.

3. Look through the viewfinder of the camera and half press the silver shutter button down, a digital display of numbers shows up.
As you turn the dial, you will see the number changing on the digital display which lets you know how open or closed the camera lens is.
These are called 'F-stops'. You need to select f 5.6. (scroll down the article to F-Stops section to see an image of how this would show up on your digital display)
4. The camera automatically selects the appropriate shutter speed so you get the correct exposure.
5. Point and shoot – that's it.
6. When you've taken a few test shots scroll to the bottom of this article for the weekend project.
Understanding the Manual Functions of your Camera
If you want to experiment more with your camera, below is my basic overview of the functions I use for my set ups.
Photography, especially digital photography, is a vast subject in its own right, so what I'm giving here is just a very brief overview to the camera that I use and the lenses that I find work best for me. It is by no means a definitive guide as camera technology advances so quickly some of the elements, such as iso-sensitivity, are less important with more modern cameras.
I've based it on the camera I use which is my trusty 6-year-old Nikon D80 but the principles will ring true for most DSLR cameras of around that era.
The Exposure Triangle
In all photography, from film to digital, to achieve the correct exposure is a balancing act between three elements.
- Aperture of the camera lens
- Shutter speed of the camera
- The sensitivity of the film/digital sensor.
We are going to look at these one at a time and see how they relate to achieving a good reference photograph for your still life paintings.
Manual mode

1. Turn the dial on the top of the camera to Manual Mode. This has the symbol of M
2. Check your lens is on Auto Focus and the focus mode selector switch is set to AF
Depth of field
Definition: "The area in front of and behind a focused subject, in which the photographed image appears sharp".
This is a term that describes the range in a photograph, from near to far, that appears to be in sharp focus.
When using your camera you need to be able to use 'depth of field' to your advantage.
If you're out in in the mountains and want the flowers at your feet to be as sharp as the mountains in the distance you need a deep or wide depth of field.
But say you're still in the same mountains and want the flowers at your feet to be sharp but the mountains in the distance to be blurred, you need a shallow or short depth of field.
For our purposes, to try and match how the human eye observes objects for a painting, we want a reasonably shallow or short depth of field. This will give us focus on the subject, but leave the background blurry, so we concentrate more on the main objects and will stop you getting distracted by unimportant details in the background.

Deep depth of field: Notice how the fence posts in the foreground are in focus, as is the house and mountains

Shallow depth of field: Only the brush is in focus, even the paints at the front of the palette are out of focus
Pro tip: If you have a quick glance around you, notice how your actual focus on close up objects is quite small. This is called your 'persistence of vision' and is the secret sauce to creating realistic portraits.
Now you'd think there would be a dial or button on your camera, called 'Depth of Field' that adjusts the camera settings – but there isn't. (Well that's what Vanessa was looking for when she was helping me out on the video shoot and so I thought it a valid point to mention)
To create and change your camera's depth of field you need to adjust the camera's aperture.
Pro tip: There is, however, and not to be confused with, a 'Depth of Field preview feature' on some cameras. It allows you to review your shot before you take your image, but I feel it's better if you have a good understanding of aperture rather than using this feature which I hardly ever use.
Understanding aperture

Photo credit: Adrià Ariste Santacreu cc
The Aperture describes the size of the hole in a camera lens that light can pass through to hit the cameras sensor. On most lenses you can change the size of the hole – this is called adjusting the aperture.
Changing the aperture on your camera will affect two things:
- The level of light reaching the camera sensor (which allows you to achieve a correct exposure)
- The photograph's depth of field (which allows you to alter your range of focus)
A small aperture size lets in a small amount of light – resulting in a photograph where everything is in sharp focus – which is often referred to as Deep Focus
A large aperture size lets in a large amount of light – resulting in a photograph where only a small area is in sharp focus and the background is blurred – which is often referred to as Shallow Focus
Depending on the camera you're using, on most DSLR's you can change the size of the aperture by turning a dial on the back or the front of your camera.
If you click the dial one way or the other, the hole (aperture) either decreases or increases in size.
But when you're looking through the viewfinder of your camera, you can't easily see the lens and what's happening inside. What you can see when you half press the silver shutter button down, is a digital display of numbers which let you know how open or closed the camera lens is.
These are called 'F-stops'.

This illustrates approximate sizes of the lens opening and the corresponding F-Stop range
F-stops
 These are the incremental units of measurements that are used to let you know:
- How much light is being let into the camera – for exposure
- How large or small the lens opening is – how shallow or deep the depth of field will be.
Example 1: F2.8
The smaller the F-stop number – F2.8 – the larger the aperture size.
And we know the larger the aperture size the more light is let into the lens, and the depth of field will be shallow isolating the foreground from the background by making the foreground objects sharp and the background blurry.
Example 2: F22
The larger the F-stop number – F22 – the smaller the aperture size.
And we know the smaller the aperture size the less light is let into the lens, and the depth of field will be deep.
A large f-stop number such as 16, 22 or 32 will bring all foreground and background objects in focus.
It might seem at this point using the auto functions on your camera seem like an incredibly good option! But stick with it as soon as you get F-stops – you're away.
And here's a couple of lines you can drop to make you feel like a pro:
Pro tip: When your lens is at its lowest aperture number, you can say you're shooting 'wide open'
Pro tip: When you move from one f-stop to the next (from 2.8 to 2.0) it is called 'stopping down'
For our set up
We're looking to have a depth of field that is of a medium range of focus, long enough for the object to be in-focus but short enough for the background to go blurry.
I've gone for a F-stop of 5.6
But how do I get those really blurry, short depth of field shots I see in food magazines or like the paintbrush photo in the article? I've tried but by camera only goes down to 5.6 – what am I doing wrong?
You're not doing anything wrong, you just might be unwittingly using the wrong lens.
Most lenses that come bundled when you buy a camera are called 'kit lenses' such as the 18-55mm zoom lens.
Now if we look closely at the description of the lens we can see why it's stopping our food blog dreams!
Hidden away on the side and on the front of the lens is a number that tells you the maximum aperture for that lens. If it is a zoom lens there will often be 2 numbers as the aperture size changes depending on zoom focal length.
All lenses have a limit on the size of the aperture, this means that with this particular lens, the maximum aperture is between f 3.5 – f 5.6.
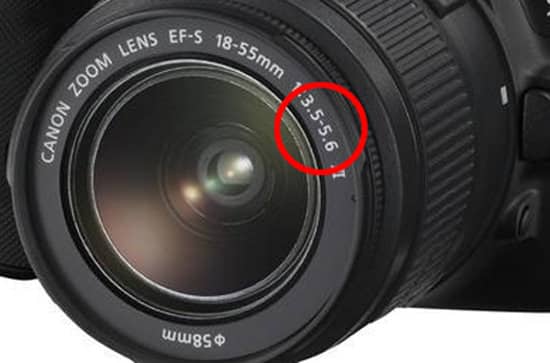
f 3.5 is a pretty short depth of field but for food photography often f 1.4 is used.
So depending on the results you want, you might need a new lens.
What is lens speed?
Lenses for photography are often called slow or fast lenses.
The smaller the maximum aperture number (f 1.8 for example) the 'faster' the lens.
It's called a fast lens because it allows more light to enter into the camera and as such you can use a faster shutter speed (we'll come to this next)
So this is why if you've ever taken your DSLR to an indoor party the flash keeps on popping up and the photos don't look as 'pro' as you might have thought – very disappointing! But you just had the wrong tool for the job.
Why?
If you're shooting photos in a low-light setting with a kit lens,18-55mm zoom lens let's say, that only has a maximum aperture opening of 5.6, the lens can't let enough light into the camera quick enough to get a correct exposure, so the flash compensates for this and pops up resulting in a flat photo.
When I say flat, I mean the light of the flash is directly in front of the subject so doesn't model the shape at all, on top of that if anyone moves quickly there will be motion blur because the camera has to keep the shutter open for longer to allow enough light for a correct exposure.
So let's go back to the party, a better lens choice would have been a 35mm or 50mm prime lens with a maximum aperture of 1.8.
Then you could shoot with an aperture of 2.0 or 3.2, which would allow more light to enter the lens. A faster shutter speed could then be used that would capture and freeze-frame movements so counteract the motion blur.
If you want a lens with a low aperture number – you need a prime lens.
What is a prime lens?
There are very broadly two types of lenses in photography, the fore-mentioned zoom lens and a fixed lens.
Fixed lenses are called prime lenses, and these are what you need to instantly improve your still life photography – in my opinion.
Prime lenses have a fixed focal length, so you have to move to change the view, exactly like you have to when painting a still life from life.
The closest lens available equivalent to the human eye is a 50 mm lens. This was often favoured by photographers such as Cartier-Bresson, as the view was closest to what they saw with their eyes.
So I always like 50 mm lens due to the romance of it, but the one thing to be aware of is the old film cameras had a wider frame size, a full frame view.
Some of the more expensive digital SLR cameras do have a full frame view but most entry-level digital SLR's have a smaller digital sensor in size, so when you put a 50mm lens onto your camera body you will get a slight crop factor.
This means when you look through your lens it's a bit like a zoom, but realistically, all that's happening is you're getting less of a field of view. A simple fix is to take a couple of steps back if you need to get more into your frame of vision.
Pro tip: I use a 50mm prime lens, but with the camera that I use (a Nikon D80) it gives an 'equivalent focal length' of 75mm
Why are some prime lenses more expensive than others?
The price of a prime lens often increases in relationship to the lower the aperture number (wider the aperture)
So a 50mm prime lens from Nikon with the lowest aperture setting being 1.4 is around £299.00
Whereas a 50mm prime lens with the lowest aperture being 1.8 is around £100
Unless you intend on shooting some very shallow depth of field images, I'd put your money towards some artist quality paint instead because 1.8 is probably the lowest you'd need to go.
So we've got this far, we now understand how to achieve the right level of background blur for our paintings using the aperture, now we need to balance the amount of light coming through the aperture with the speed of the shutter so we get a correct exposure.
What is shutter speed?

The shutter on your camera is a small metal curtain that opens and closes to control the quantity of light hitting the sensor.
Shutter speed is a measure of how long the shutter stays open as the photo is taken.
The longer the shutter is open, the more light is permitted to hit the sensor.
The speed of your shutter is measured in fractions of a second and can range from 1/8000th of a second to several seconds.
A 'fast shutter speed' enables you to freeze motion of a subject, but for our purpose we're not worried about capturing motion unlike when we were at that party!
You have two options when choosing your shutter speed for our still life set up:
1. Hand hold the camera and use a shutter speed fast enough that you can't see any noticeable camera shake. 1/125 of a second is a good speed to aim for in a well-lit room.
2. Use a tripod for your set up. As the still life doesn't move, you have the luxury of using a slower shutter speed 1/60 or 1/30 and still getting the amount of light you're after even if the light conditions are quite dark.
So now we have 2 parts that allow the lens to let light into the camera
- The size of aperture
- The speed of the shutter
Taking well-exposed images for our setup involves setting a shallow depth of field by using a lower f-stop number on the lens f 5.6 and then leaving the shutter open long enough for the correct amount of light to reach the sensor.
With a tripod, this is easy to do because you can keep on leaving the shutter open for a longer amount of time to get a good exposure.
If you haven't got a tripod and are holding the camera by hand, shooting indoors you might run the risk of it being a little dark depending on your lighting conditions of the room you're taking your photograph in.
Handheld shooting but my photos are coming out too dark
If you've followed the steps so far and are hand holding, take a few test shots and see what the exposure is like. If they're coming out too dark (which is likely to be the only case) you might need to tweak the settings.
As I've said before getting the right exposure and style is a balancing act.
You could tweak the aperture from f 5.6 to f 4.0 or the shutter speed from 1/125 to 1/100 or 1/80 the name of the game is to experiment with your new knowledge and look at your shots and see what works for you in your specific space.
There is one last setting you can use to adjust the exposure. This is called ISO and it makes the sensor more sensitive to light.
What is ISO?
In traditional film cameras, there were different film stocks available for different lighting situations. You had to match your choice of film to the lighting conditions and the nature of the subject (moving or static).
Film speed is measured in ISO ratings (the slower the speed, the finer the grain of the film)
Fast films (ISO 400 and above) used in low light situations or for a fast moving subject.
Slow films (ISO 100) are better for portraits and still life as they give smoother details due to the finer grain.
On your digital camera, you can easily change the ISO sensitivity of the camera sensor.
As a rough guide, every time you increase your ISO by 100 (therefore increasing the sensitivity to light of your camera sensor) you increase the shutter speed by 50%.
So if you change your ISO from 100 to 200 you're shutter speed would change from 1/125 second to 1/250 second to receive the same amount of light to the sensor.
Pro tip: So just as changing the aperture size one stop, doubling the ISO (from 100 to 200 – 200 to 400) is considered a 1-stop change.
If you want to see all the settings we've talked about and change them virtually, have a look at Canons virtual DSLR. It's a brilliant way to help you visualise the changes.
Weekend workshop
So this weekend is a great time to dust that DSLR off and try to arrange a basic still life setup and get clicking.
The set up I'll be using for the tutorial next week is a clear glass filled with water.
Experiment with your camera settings and look around the house for a good window to give you nice natural light and try and take a shot of a glass filled with liquid.

For the lighting conditions I was working in (natural window light) the camera settings I used were:
- Camera: Nikon D80
- Lens: 50mm 1.8D
- Aperture: f 5.6
- Shutter speed: 1/320
- ISO: 400
Phew! After all that I'm wishing that the glass of water was a glass of gin!
Happy snapping and next week I'll be talking through the lighting and colour choices I made to achieve the final shot above that we'll be using to paint from.
1. You can read Part 2 here
2. You can read Part 3 painting demo here
Beginner Still Life Reference Photos
Source: https://willkempartschool.com/how-to-shoot-stunning-still-life-set-ups-for-your-paintings-part-1/
Posted by: halpinhounch39.blogspot.com
0 Response to "Beginner Still Life Reference Photos"
Post a Comment